
Review: Exped SynCellMat5
I’ve been spending a lot of time on sleeping mats lately, as evidenced by my long term review of the perennial and excellent Exped Synmat7. Wanting variety, and backup, and because I’m a gear whore, I purchased the Exped SynCellMat5 from REI a few weeks ago.
*Note: Living 8 miles from the REI flagship store is awesome. And financially perilous. Let me go back and face the peril. No, it’s too perilous.

Exped Syncellmat 5 and Synmat 7
Buying the mat from REI means paying MSRP. But, as a member, it basically means 10% back also. And the REI exclusive add on to this mat is the Exped Schnozzle pump bag, a roll top drybag with a short hose at the bottom. The hose snaps to the mat, and makes inflating a breeze. The bag is $30, so it’s a pretty good deal overall. And buying from REI has another huge advantage, that being their return policy. Sorry for the spoiler.
The mat is made from the same durable materials as the Synmats, and was in theory the same size as my Synmat7 M. It didn’t feel as big though. The baffles are split up into a hundred small chambers instead of eight long ones. This means lots of little insulated air cushions, in a smaller and lighter package than the Synmat7. I laid on it in the store. Seemed pretty good, here’s my money, more good kit in the collection.
Fast forward to the one night I slept on it. Well, the one hour I laid on it. It’s just nowhere near the comfort I’m used to from my many weeks sleeping on my Synmat7 every night. It’s marginally more comfortable than closed cell foam egg crate style mats. It has an R-Value of 2.9, more than adequate for cool to warm weather.
I suspect, since Exped is a very clever gear maker, that this mat is more specifically for hammock use, as it is very flexible even when fully inflated. Unfortunately I didn’t have access to my hammocks at the time of the review and couldn’t adequately assess the mat in this roll.
If you decide to buy this mat, and I’m not necessarily saying you shouldn’t, buy it from REI. Their inclusion of the pump bag makes it as good a value as you will find, and more importantly, if you don’t like it, you can do what I did. Return it for a full refund, no hassles.
Pros:
Packed down, it is small. And light. Way more convenient if egg crate foam is what you’re used to.
Likely a very good option for hangers who want an inflatable mat in lieu of (or along with) an under quilt.
Cons:
Just not very comfortable for ground sleeping. Tested in a 68deg bedroom by the way.
In conclusion, don’t assume that every product from one of your favorite makers will do the job for you. Makers with a line as large and diverse as Exped have a chair for every ass. This was not my Goldilocks moment with a sleeping mat, but that doesn’t mean it doesn’t have a place in someone else’s kit.
A Month on the Exped Synmat 7
A Month on the Mat: A long term review of the Exped Synmat 7.
Last month I packed my stuff, fit what I could into my Fiesta hatchback, and moved to Colorado. It’s going to be my base of Gear Whoring operations while I train for my 2016 Appalachian Trail thru hike. Now, as most could surmise, a bed does not fit in a Ford Fiesta. So, since the 9th of April I have been sleeping on my Exped Synmat7. Here are my thoughts on this great piece of kit.

Exped Synmat 7 valves
The Exped Synmats are inflatable via flat inflate valves placed on the underside of the mat. In the case of the Synmat 7, the valve is very cleverly placed on a separate air chamber, which acts as a built in pump. Inflating by mouth or by accessory pumps is also possible. The mat has 8 long baffles running lengthwise, with the outer baffle on each side being slightly larger. This means that when inflated, the mat sort of holds you in place. A small but smart detail. The baffles are filled with synthetic fiber insulation that lofts when the mat is inflated, giving it a lab certified R-Value of 4.9. That’s a lot. They make a down filled mat for arctic use, but having slept on my Synmat in 0 degree temps, I can assure that it is more than enough for most winter camping anyone might do.
Mine is the M model (Medium, probably). I’m 6ft, 185. It fits me. They make mats in all sizes imaginable, navigating their line is actually a bit of a challenge, but the specs are well laid out on their website and the company has a ton of quality videos on their Youtube channel, which I highly respect.
This mat is relatively light, very warm, and comfortable enough that I am still sleeping on it nightly.
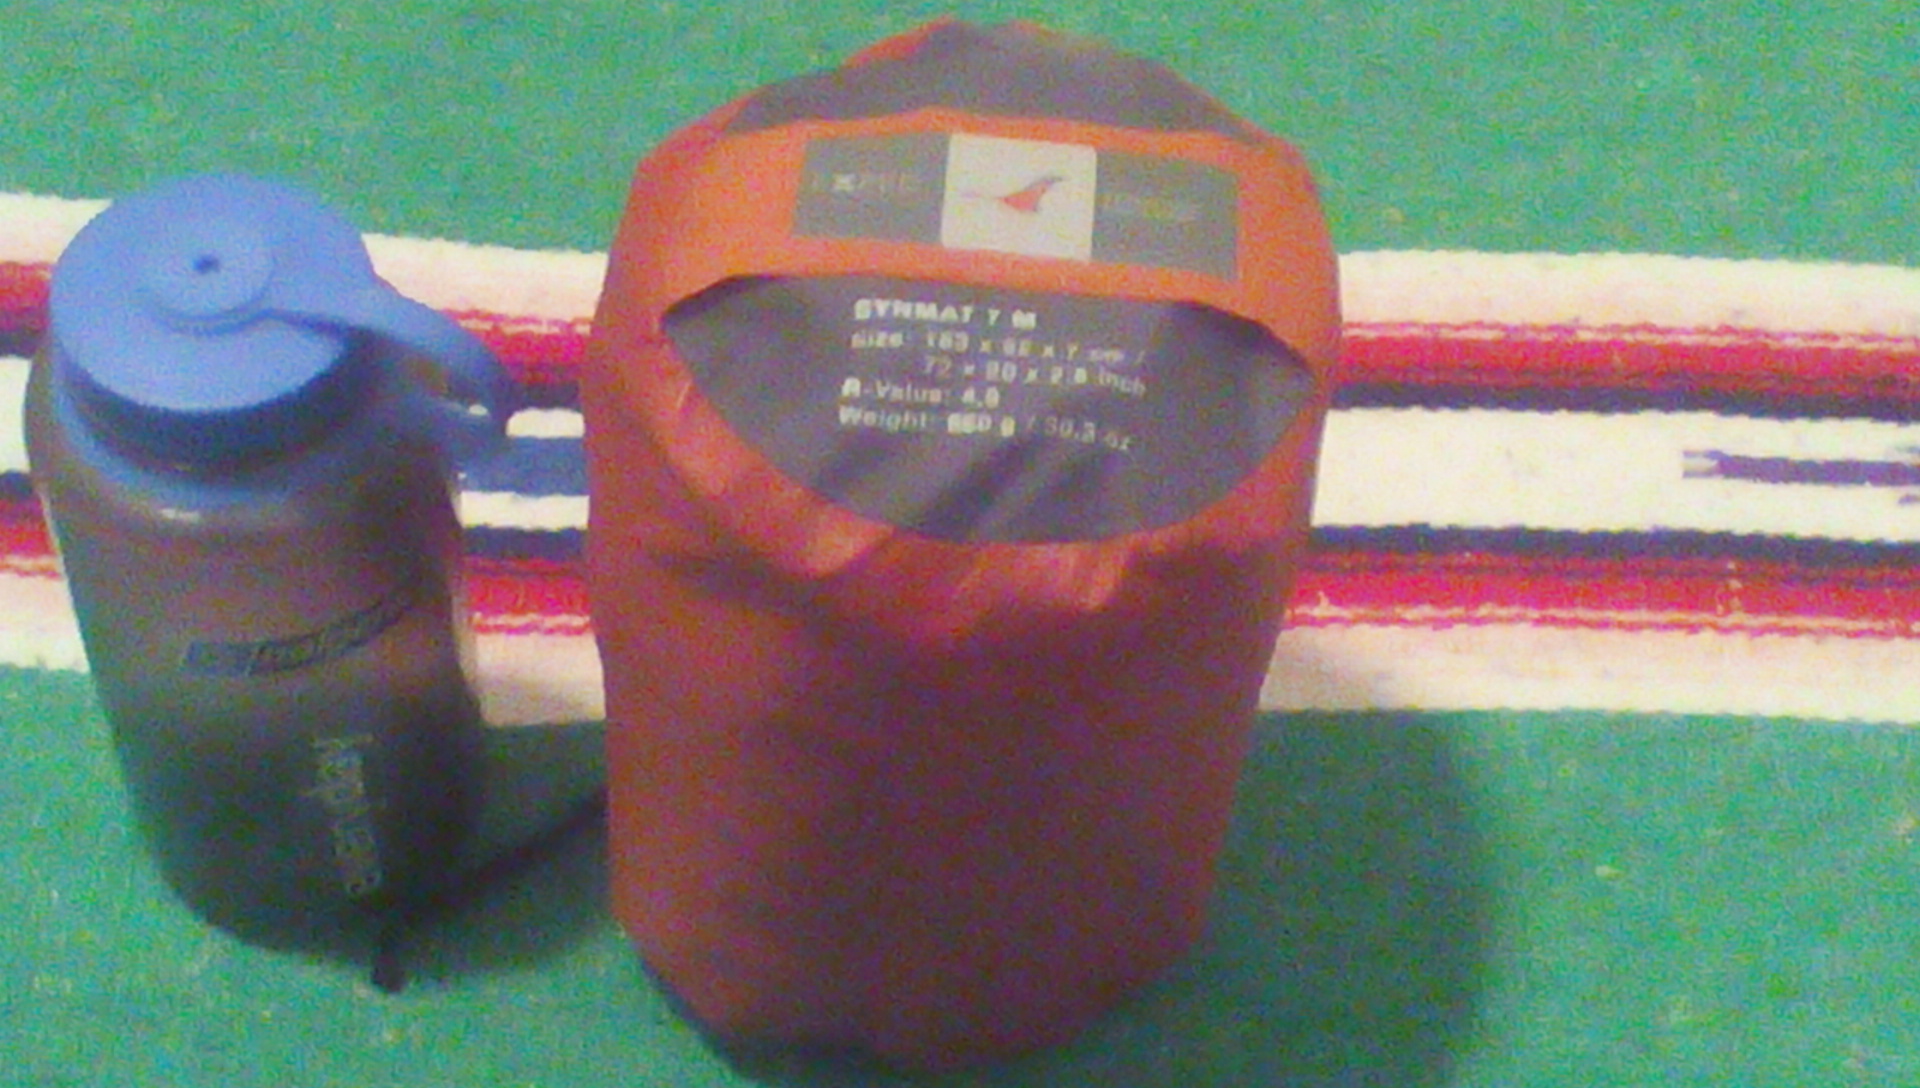
Exped Synmat 7 w/ Nalgene bottle
When fully pumped up it is a firm sleep, which is my preference. I’ve got a cheap comforter draped over it, and my Wiggys Nautilus has served as my blanket. You might think it would get old, but you get used to it pretty quick. This exercise has proven useful for a few reasons, one of which is the practicality of sleeping on a camping mat EVERY night. I’m hiking from Georgia to Maine next year, so finding the right sleeping kit is going to be crucial for a successful hike. After a month on my Exped Synmat 7, I’m nearly certain this will be the mat I take.
I’m going to compare the comfort directly against one of Exped’s lighter mats in a future review, namely the Exped SynCellMat 5. Look for that comparo coming soon.
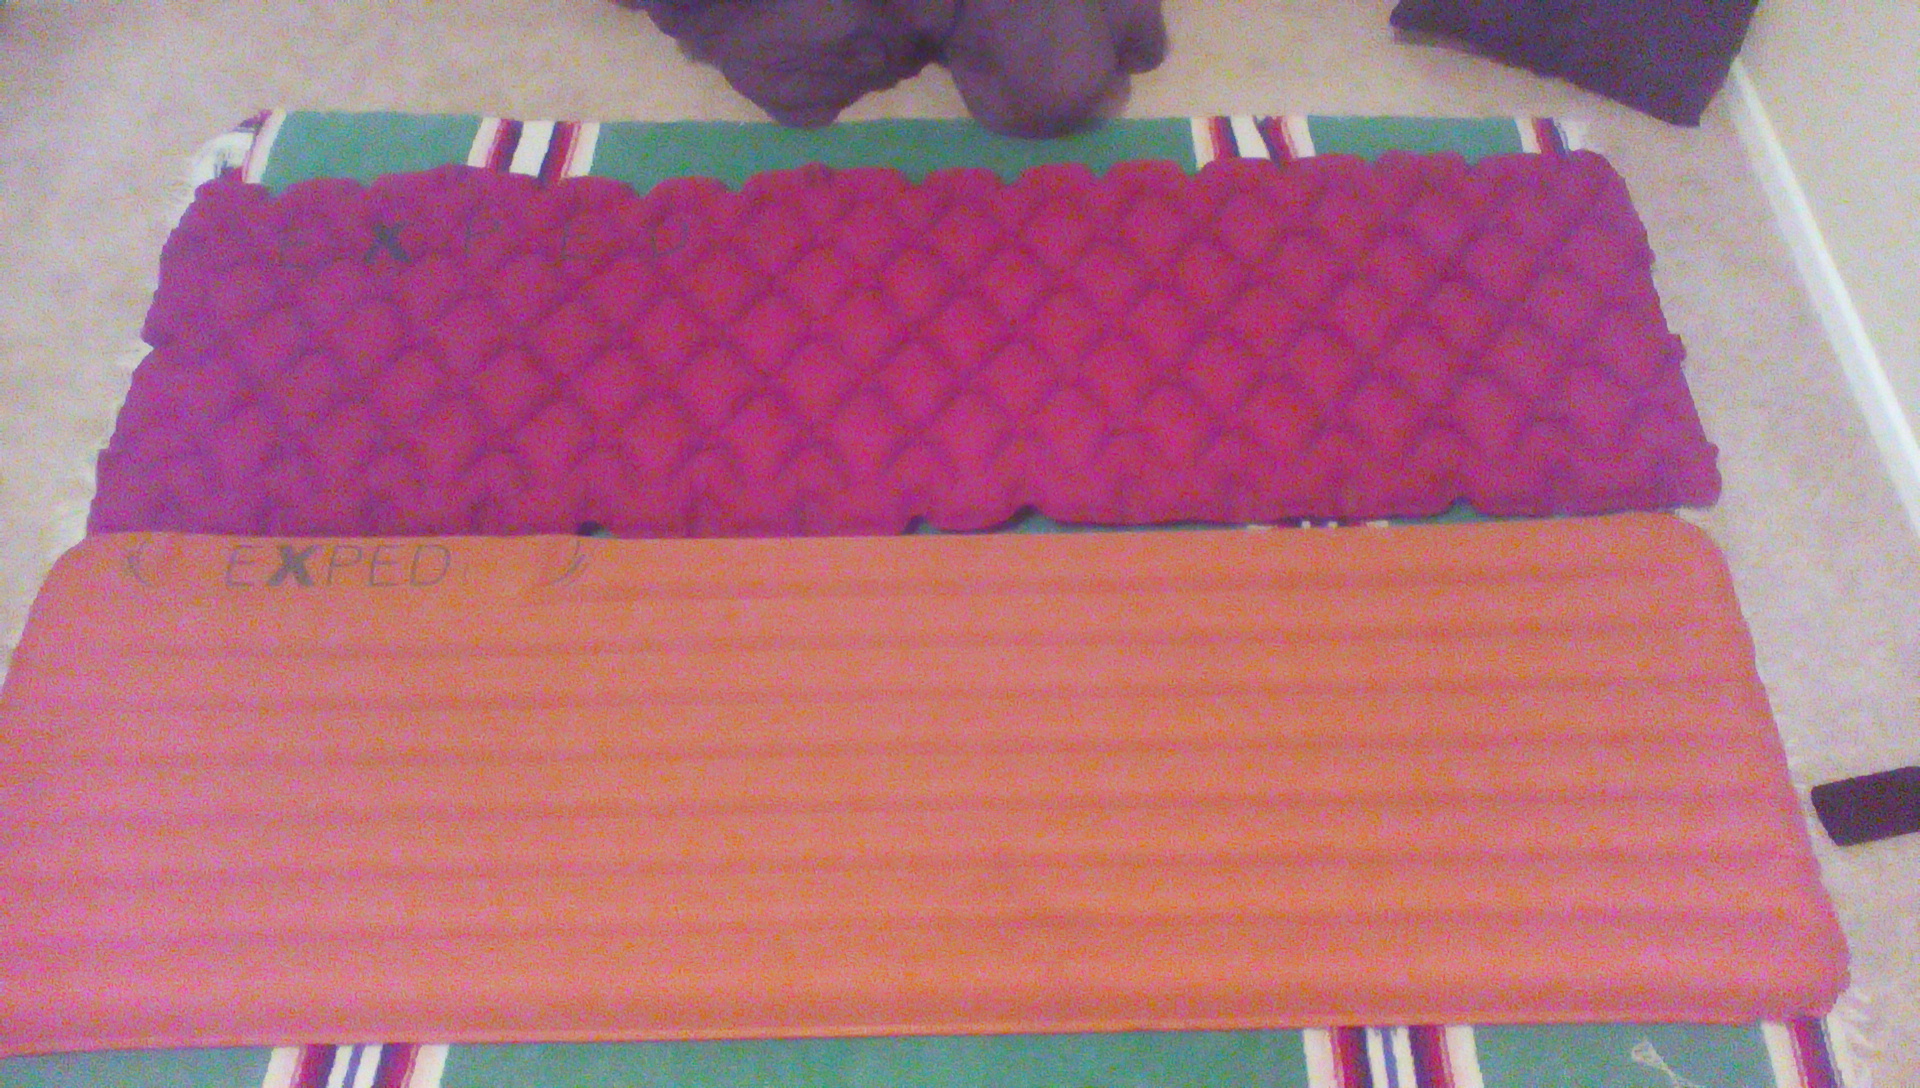
Exped Synmat 7 and Syncellmat 5
As a final thought, Exped has been a great company to work with. My first Exped Synmat 7 suffered a weld failure in one of the baffles after only a handful of uses. So there’s a bulge at one end. I sent them an email with a picture of the mat, and within a day had a response. Their response was “What’s your address, we’re sending you a new one. Just toss the old one, don’t bother sending it back.” Well, I didn’t toss the old one, it’s still usable, but that kind of service justifies the cost, and is why I bought another mat from them. In fact, I’m likely going to buy the MegaMat Duo to use as a permanent bed. $349 for a two person bed I can take car camping, from a company that has my back, yeah. That works for me.
Review: Cha-O-Ha EDC Card

cha-o-ha edc card
Credit cards are a universal item in peoples pockets today, but outside of helping your buy the things you need what do they do? The answer is, not much other than being a fancy piece of plastic with a magstripe and numbers on it. Their major contribution to the edc landscape has been to provide a standard form factor for items that fit in your wallet, besides old fashioned analog money. With this shape in mind the Cha-O-Ha Design Company took it on themselves to take a similarly shaped slice of S35vn blade steel and make an everyday carry tool called the EDC Card.
–Design–
Tools of this type are becoming more popular. Many knife makers, such as Snody and Microtech offer titanium card tools, but those mostly focus on their ability to be edged implements and skimp out on other options. Some tools made do include options such as wrenches and screwdrivers, such as the gimicky Wallet Ninja or the generic $3 “survival cards”, but these tools are typically made with low quality, thin steel or are designed in such a way that many options are not easily usable. The Cha-O-Ha EDC Card overcomes these shortcomings in quite a few ways.
The material used in the Cha-O-Ha EDC Card is a huge plus for this tool. This card
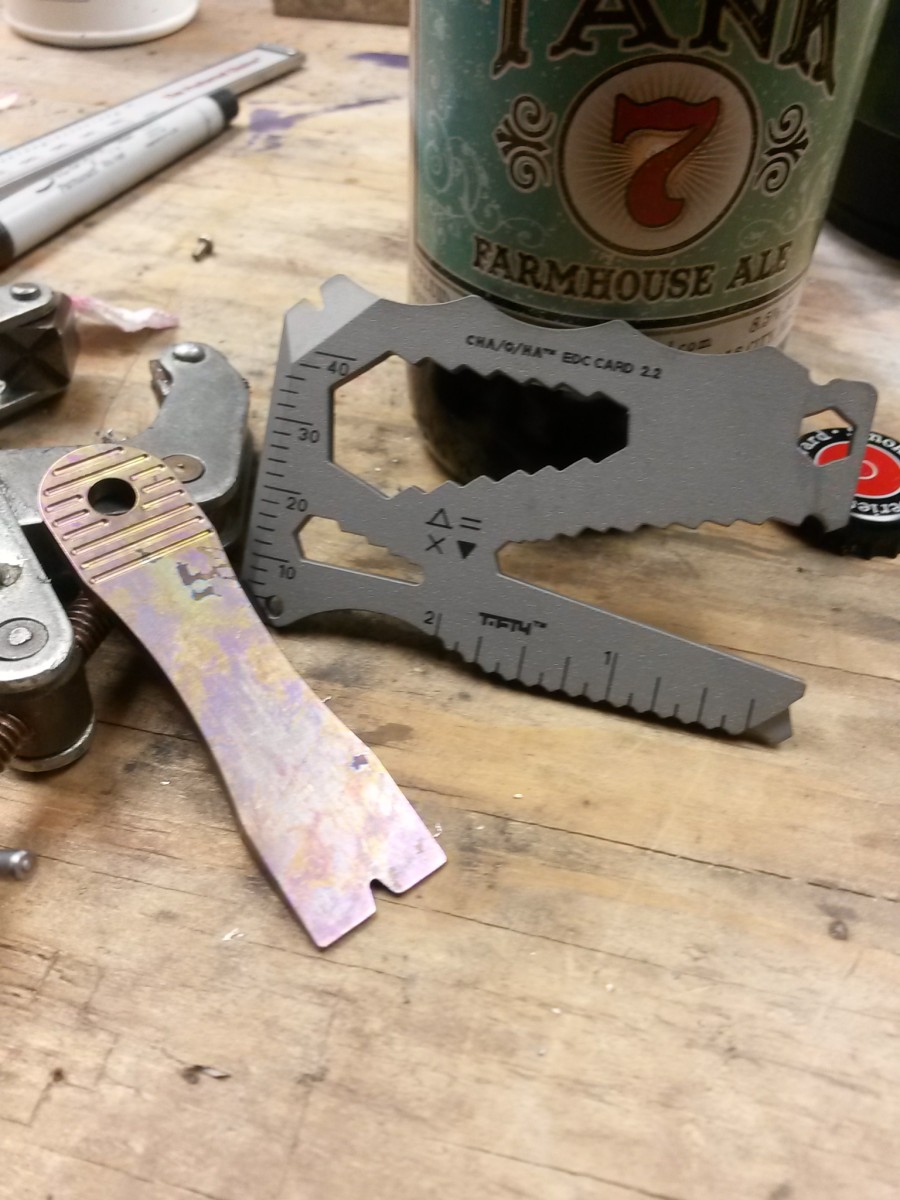
cha-o-ha edc card w/ Boulevard Tank 7
is carved from a generous chunk of CPM S35vn steel. A steel originally produced as a collaboration between Crucible Industries and Chris Reeves Knives, it is considered a premier steel for use in high end knives and tools. As an example we’ve worked with S35vn in our time with Sniper Bladeworks and Grindhouse Knives, and it has proven to be excellent in its applications with these knife makers, and has a special place in our heart. To have this material in a compact, easy to carry, card shaped tool, certainly speaks to the durability and longevity that the designers at Cha-O-Ha had in mind when creating the EDC Card.
For being slightly smaller in overall dimensions than a typical credit card the EDC Card packs quite a few tools into it’s frame. According to the Cha-O-Ha website it includes the below list:
- 23 hex wrenches, metric and imperial:
- Closed Hex Drivers ( 2.5mm, 3.2mm, 4mm, 5mm, 1/4″, 8mm, 10mm, 7/16″, 13mm, 9/16″, 16mm, 11/16″ )
- Open Hex Drivers ( 3/16″, 5.5mm, 1/4″, 8mm, 10mm, 7/16″, 13mm, 9/16″, 16mm, 11/16″, 19mm)
- 1/4″ hex driver with optional o-ring retention, designed to hold any 1/4″ screw bit shank for unusual fixes.
- 5 x 0.8mm flathead driver
- #2 phillips driver
- Bottle opener (open hex driver)
- Lanyard Hole
- Prybar with nail lifting slot
- Tapered straight edge
- 2″ imperial ruler
- 30mm metric ruler
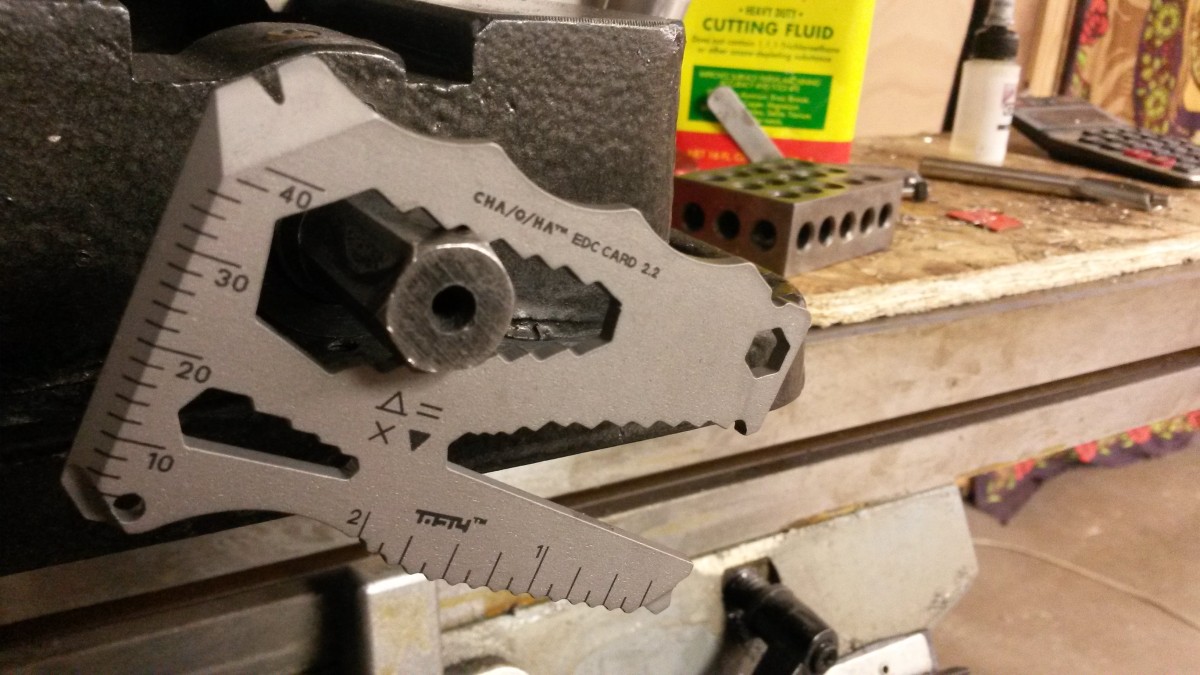
cha-o-ha edc card wrench
A multitude of wrenches certainly dominate the list. Of them the open ended wrench option is certainly a good design, as this seriously extends this tool’s capabilities. The open ended wrench area, in conjunction with the recesses milled for a retention O-Ring, act as the EDC Cards bottle opener feature, which for any edc tool is a required feature.
The outside edge of the EDC Card is sculpted in such a way as to offer essentially three finger grooves and a recessed area for your thumb. This attention to detail really helps you to had a nice feel to the EDC Card when held and used. It also offers the ability to really put this device to work.
–Performance–
Being a thick slab of S35vn steel is good for durability, but is not so good when trying to get it into one’s wallet, unless you’ve accounted for it in design, which apparently Cha-O-Ha did. Trying to get the EDC Card in a Spec-Ops The Wallet Jr was not an issue, even with it already laden with other cards, and cash. Placing the now loaded wallet back in our pocket, one did notice the added thickness and rigidity of the wallet, but it isn’t anything that one wouldn’t get used too.
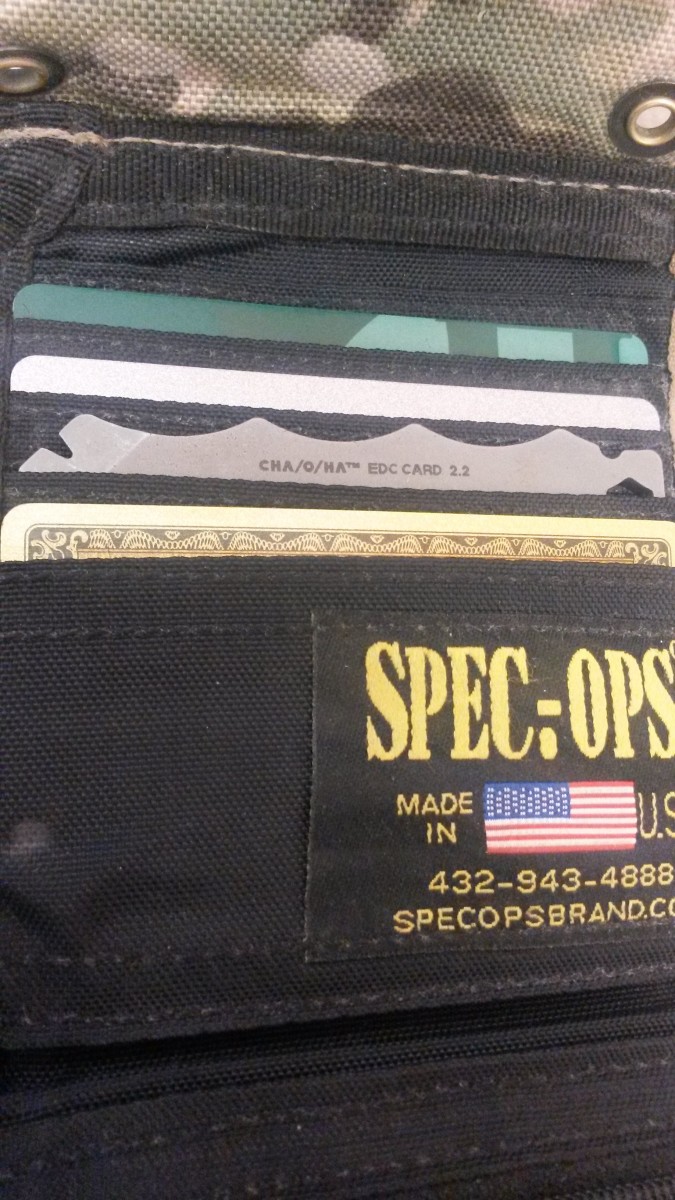
cha-o-ha edc card in Spec-Ops Wallet
Of the tools available on the EDC Card we decided to test the bottle opener first,which worked perfectly well. A quick snap of the wrist, after placing the open wrench end of the card on top of a bottle of Boulevard Tank 7, provided us with a cold and tasty farmhouse ale. Next we utilized the flathead driver milled into corner opposing the prybar to tighten up the pivot on our Sniper Bladeworks LPC. The flathead was fine enough to easily do the job, and precise enough to not mar the titanium screw. Playing around we wanted to check the sizing on the closed end wrenches. Wrapping the EDC Card around the flat table adjustment of the mill showed that the graduated design of the wrench allow for quick and easy fitting on the float arm.
–Overall Impressions–
The team at Cha-O-Ha Designs have managed to cram a host of useful everyday tools into one great piece of steel. The overall size is perfect to fit in your wallet and still be useful and comfortable in the hand. Of the features we used it performed very well at its tasks. This overbuilt well designed card has earned a place in our everyday carry kit.
Review: MSP Core M4 Stove
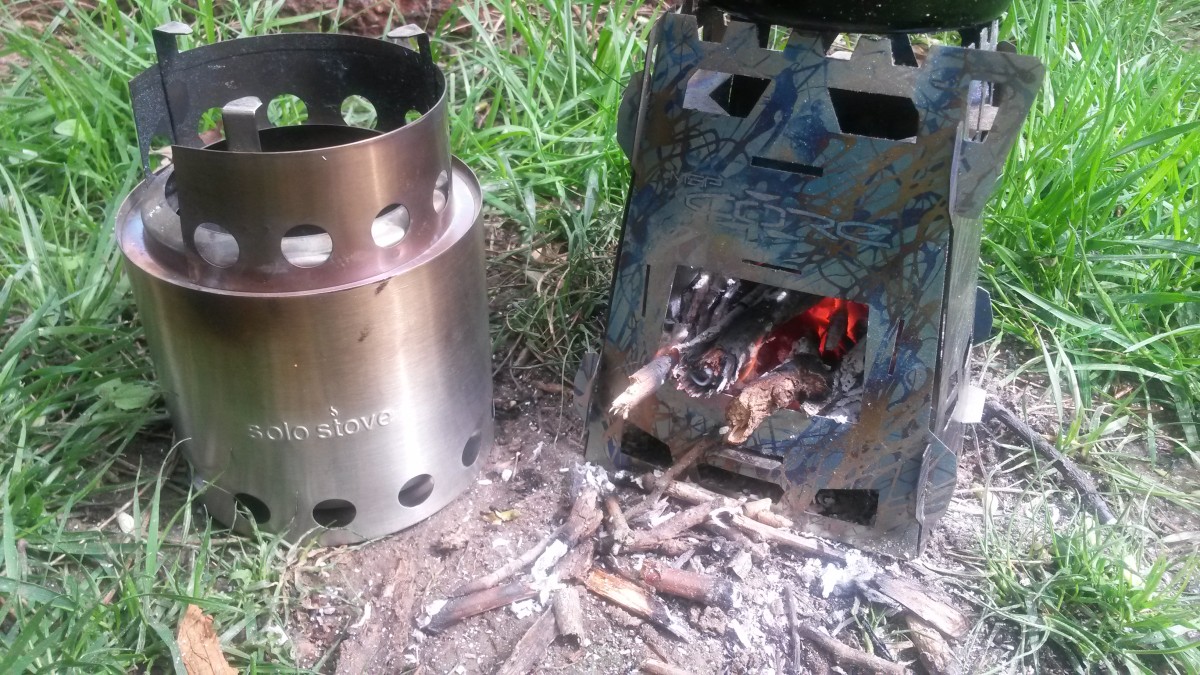
Core M4 stove vs Solo Stove
Bigger is not always better and size does matter, but it’s just a matter of what size do you need. Last time when we reviewed a stove from MySurvivalPack.com we said something similar about the Core 4 Bio-Reactor Titanium Ultimate stove. It seems that this comment was taken to heart because a little while ago Chad emailed us and asked if we would you like to take the Core M4 stove for a spin. With the indication that this new variation was a more mini version of the original, and more Solo Stove sized, we easily said yes to that offer.
–Design, Assembly, Options–
The Core M4 stove as the original has a multitude of options for assembly. With our kit being the Bio-Reactor Ultimate setup we were privy to pretty much all of them. Making a reappearance in this version was the venerable Rocket Port, TLUD plate and the internal Afterburners, all of which, when used in combination allow the Core Stove M4 to efficiently re-burn the biomass fuel and gasses inside the stove.
One of the newer options that was included was the availability of a solid “heat sheild”
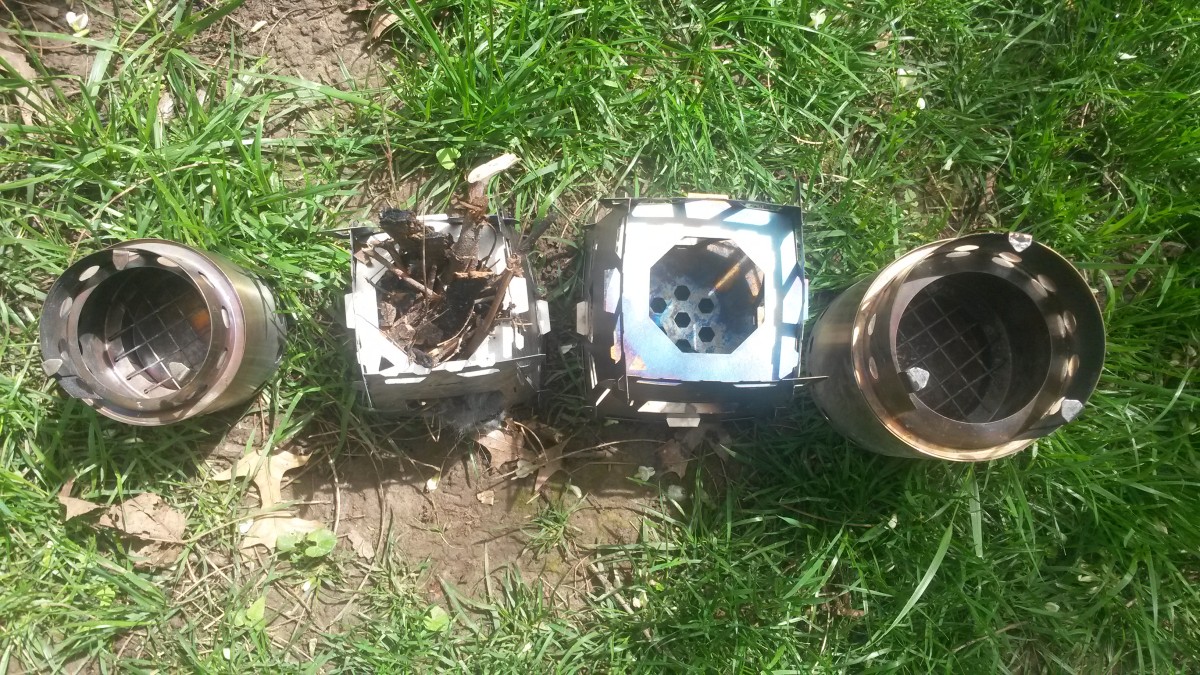
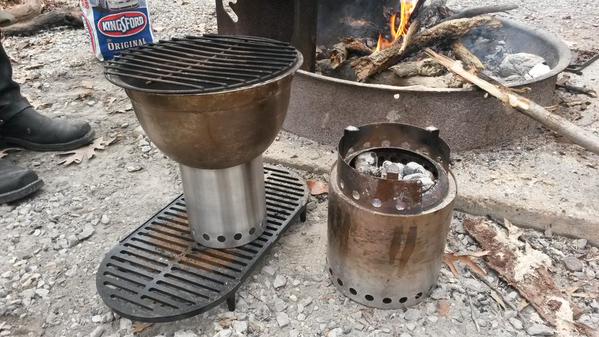
Core M4 Size Comparison
plate for the bottom of the stove. According to MySurvivalPack.com this is “…designed to protect the ground from heat damage, allow airflow under the stove and to allow the stove to be used on top of the snow” , as we didn’t have any snow in the area we didn’t give this feaure a test. Also they said alternatively it could be used as a griddle on top of the stove. I would have to say that this would certainly be an either or type of situation, or at least the plate would need a good cleaning in between these two uses. This is not the only direct cooking option included in the ultimate edition of the kit. A smaller grill specially fit for the Core M4 stove is included so one can easily cook up anything that is tasty on an open flame wood fire, which is just about anything.
During our assembly we decided again to go with a simpler configuration being four walls, three Afterburners and the TLUD plate. In our last test with the full sized Core Stove, it performed very well without the usage of the Rocket Port, and to stay consistent we decided to forego this option again. As we were snapping pieces together we came to realize that the Core Stove M4 is a bit more snug in the fit than its predecessor. For performance on the burn this is probably a positive, but for ease of assembly this was a touch frustrating. We found that the difficulty came from the TLUD plate, as it is cut so precisely to the overall size of the stove that one must be patient in the alignment process. Once we realized where we went wrong, everything came together perfectly.
The overall size as promised is smaller than the original Core Stove, and certainly compares well with the original Solo Stove. Standing about as tall as the original Solo Stove with its pot stand on certainly emphasises this point. They both show a similar overall diameter of both the burn aperture and the available pot stand space, with the Core Stove M4 actually sporting more volume in the burn box. Since these two were so similar in size we decided to try fitting a Trangia alcohol stove in the TLUD plate opening on the Core M4 stove, but no luck. The opening was just a bit too small to accommodate the base of the Trangia.
–Performance–
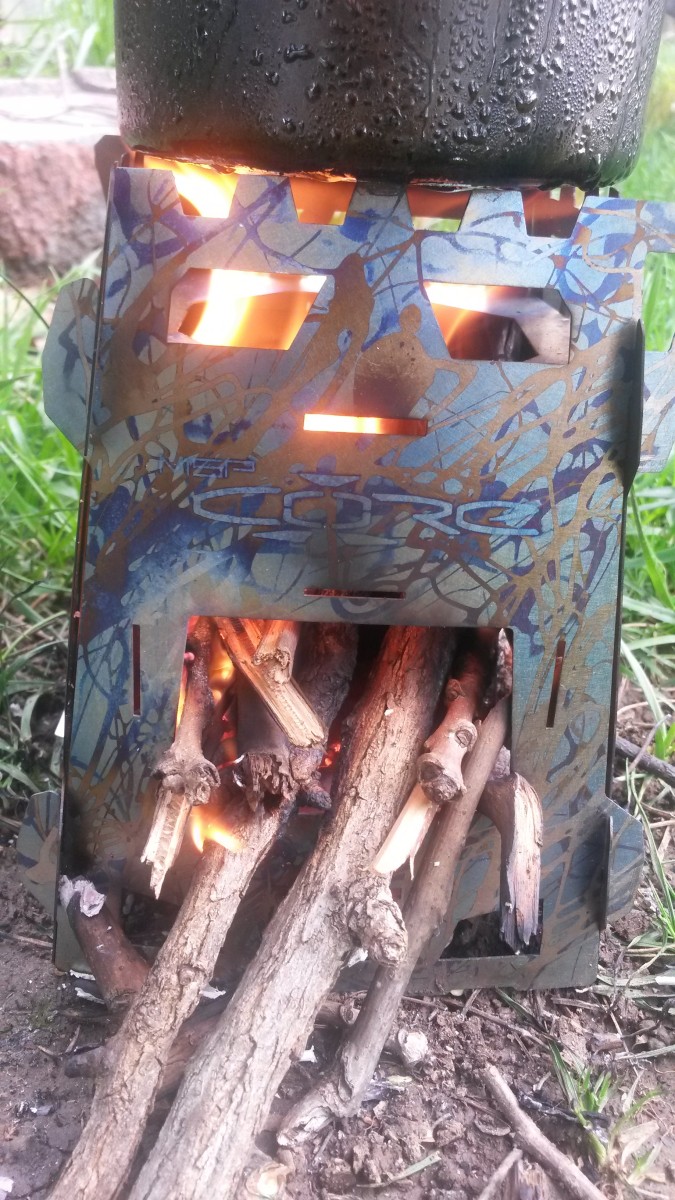
Core M4 Stove woodgas stove
Staying with tradition it seems we always choose a day to test our woodgas stoves right after we’ve managed to have quite a deluge of rain. Given that we know we’re already working with less than perfect fuel, we set off to gather what was needed to get things underway. This led us to use our trusty old egg crate/lint/paraffin homemade fire starters that have always done us so well over the years, and this was no exception. Loading the Core Stove M4 with the starter and a hearty amount of moist wood we set the assembly ablaze and got this show on the road.
Our egg crate fire starter did it’s job well and also allowed the Core Stove M4 to make quick work of it’s initial fill of fuel. Once this started to burn down a bit we began to load the stove from the open front port as designed. Even without the Rocket Port installed the Core Stove was able to dry and then burn the larger wood as we fed it into the main body of the stove, pretty quickly. We have to say that this feature is probably our favorite of the Core Stove line. The fact that you can easy feed larger fuel into it, without breaking it up, and also allowing it to dry, is a great design.
While continuing to stoak the stove we placed our 700ml titanium pot on top full of air
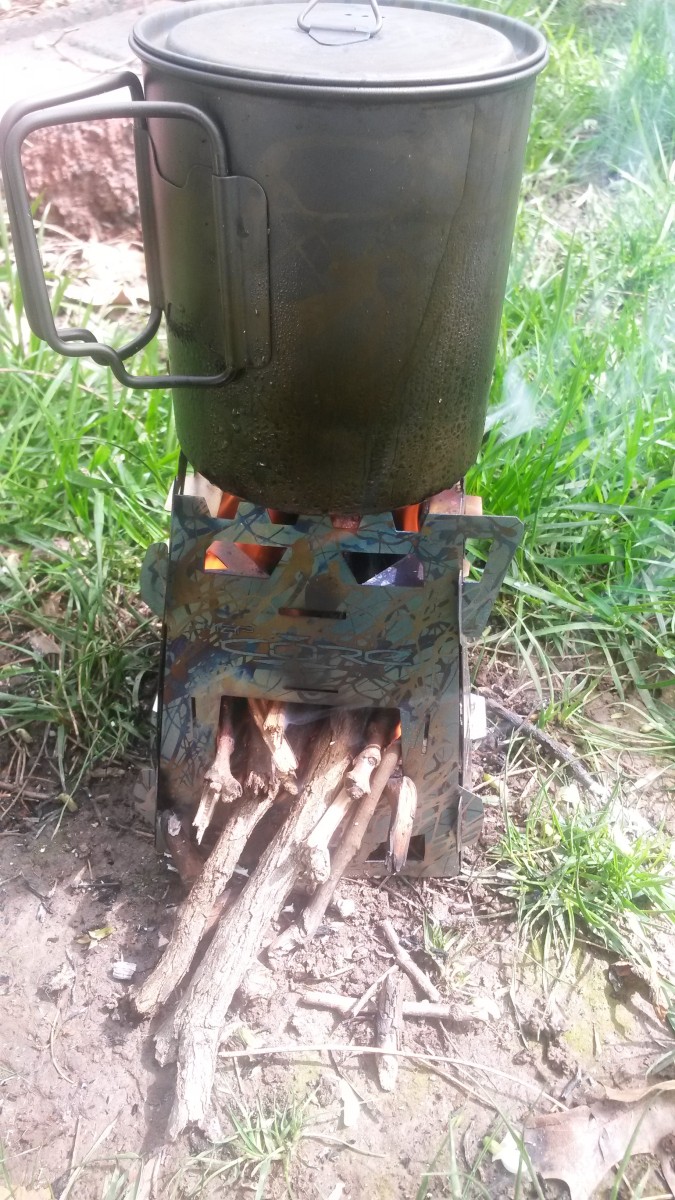
Core Stove M4 with 700ml pot
temperature water, being approximately 65F. Though the pot fit and rested on top of the smaller Core M4 stove we did immediately notice that we had to be a bit careful when we situated it. The pot we were using is pretty much the smallest diameter you could safely use on this stove, as it was just on the edge of the stand as we maneuvered it. While we were stoking the fire on one occasion we accidentally managed to have the pot tip over a bit and spill some of the water onto the fire. We quickly recovered and got everything corrected, but we certainly took notice to be careful as we handled things.
With wet wood drying quickly and burning away, our titanium pot came to a boil quite easily within 20 minutes of our start time. We did have to keep an eye on the fire and make sure to stoke it carefully, but the overall maintenance was the same as an original Solo Stove, except we didn’t have to break the fuel up as much due to the feed door. The TLUD plate and Afterburners did their jobs well, allowing the Core M4 stove to reburn the smoke produced from the fire and also keep a drafted and hot fire going to dry wood and boil our water.
–Overall Impressions–
The titanium Core Stove M4 hits a lot of good marks for us. We don’t think you could make this stove any smaller and get it to gassify as well. It’s a great size, almost the same height as an original Solo Stove, but with a bigger burn box. The whole thing is made of titanium, and that in and of itself is an excellent design choice. With a multitude of options, configuration and parts you can do quite a lot, but overall we think many of these extras might stay at home. The Core M4 stove is probably the best you can get for a lightweight, space space saving, woodgas stove. Dollar for dollar, when looking at the Core M4 stove Bio-Reactor kit vs an original Solo Stove, or even the Emberlit which does fold flat but isn’t a woodgas stove, you get a lot more for the money with the Core M4 stove.
Fox Outfitters Neolite Hammock
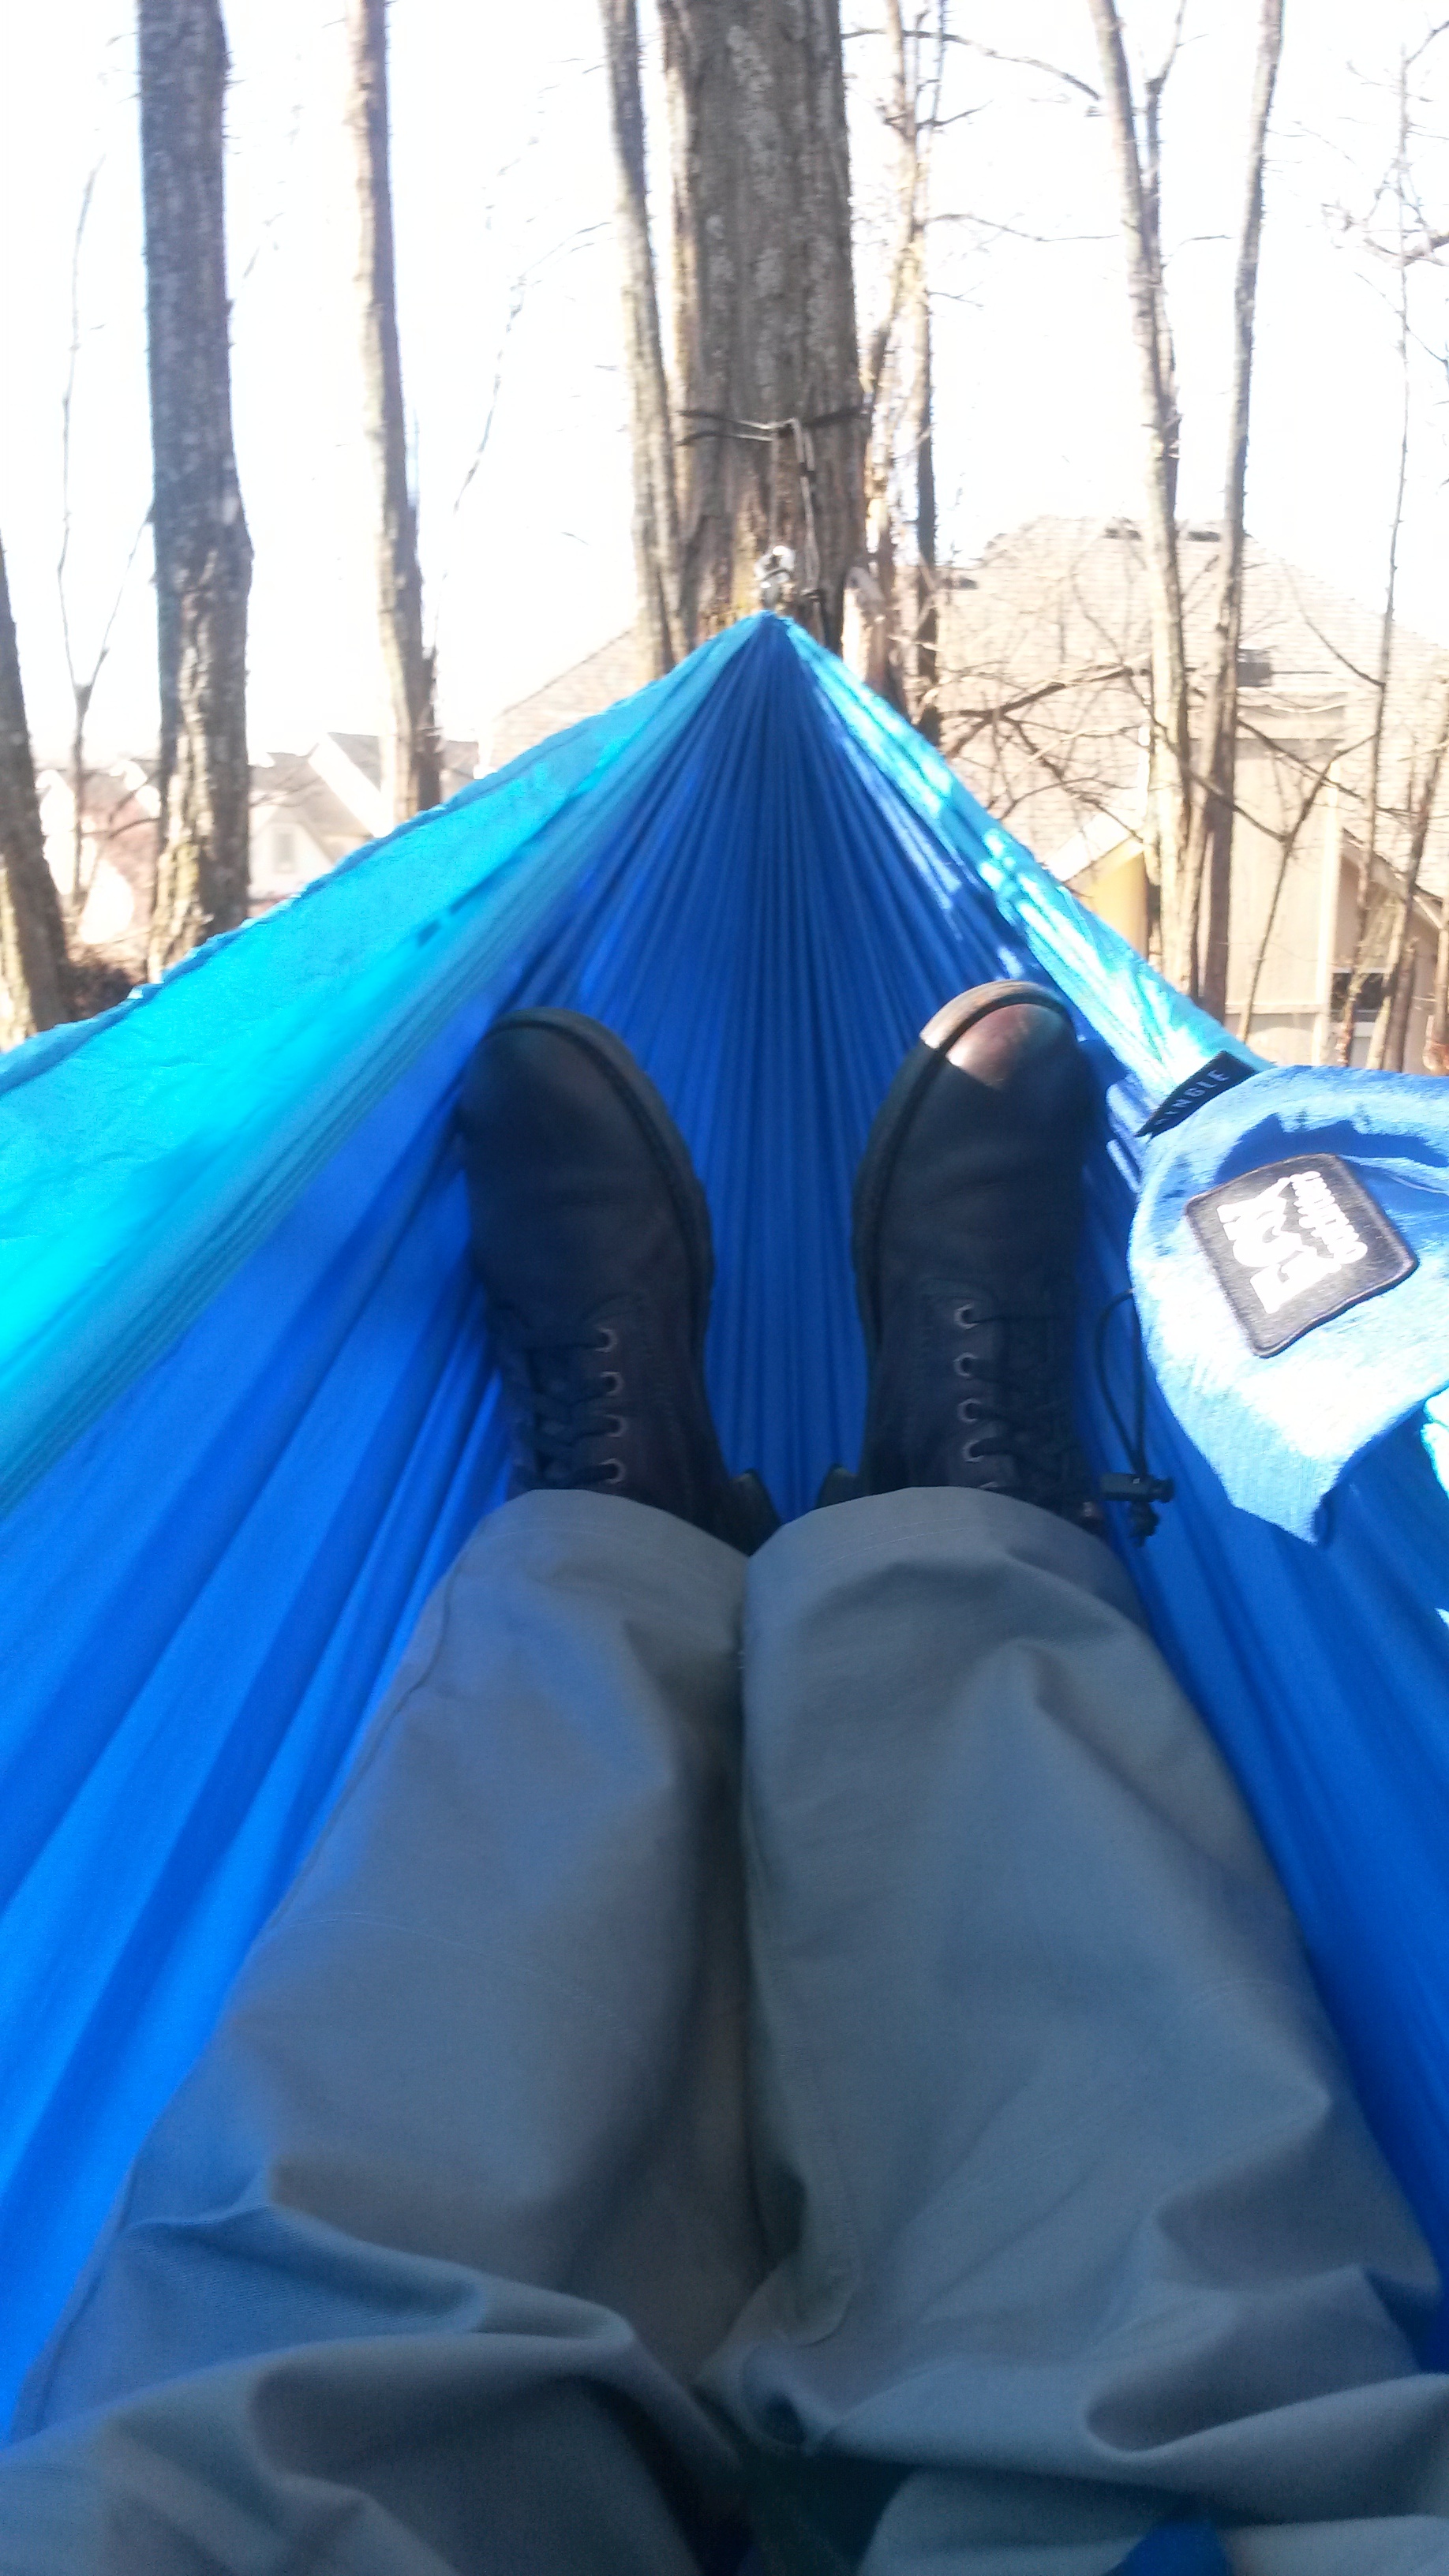
View inside the Fox Outfitters Neolite hammock
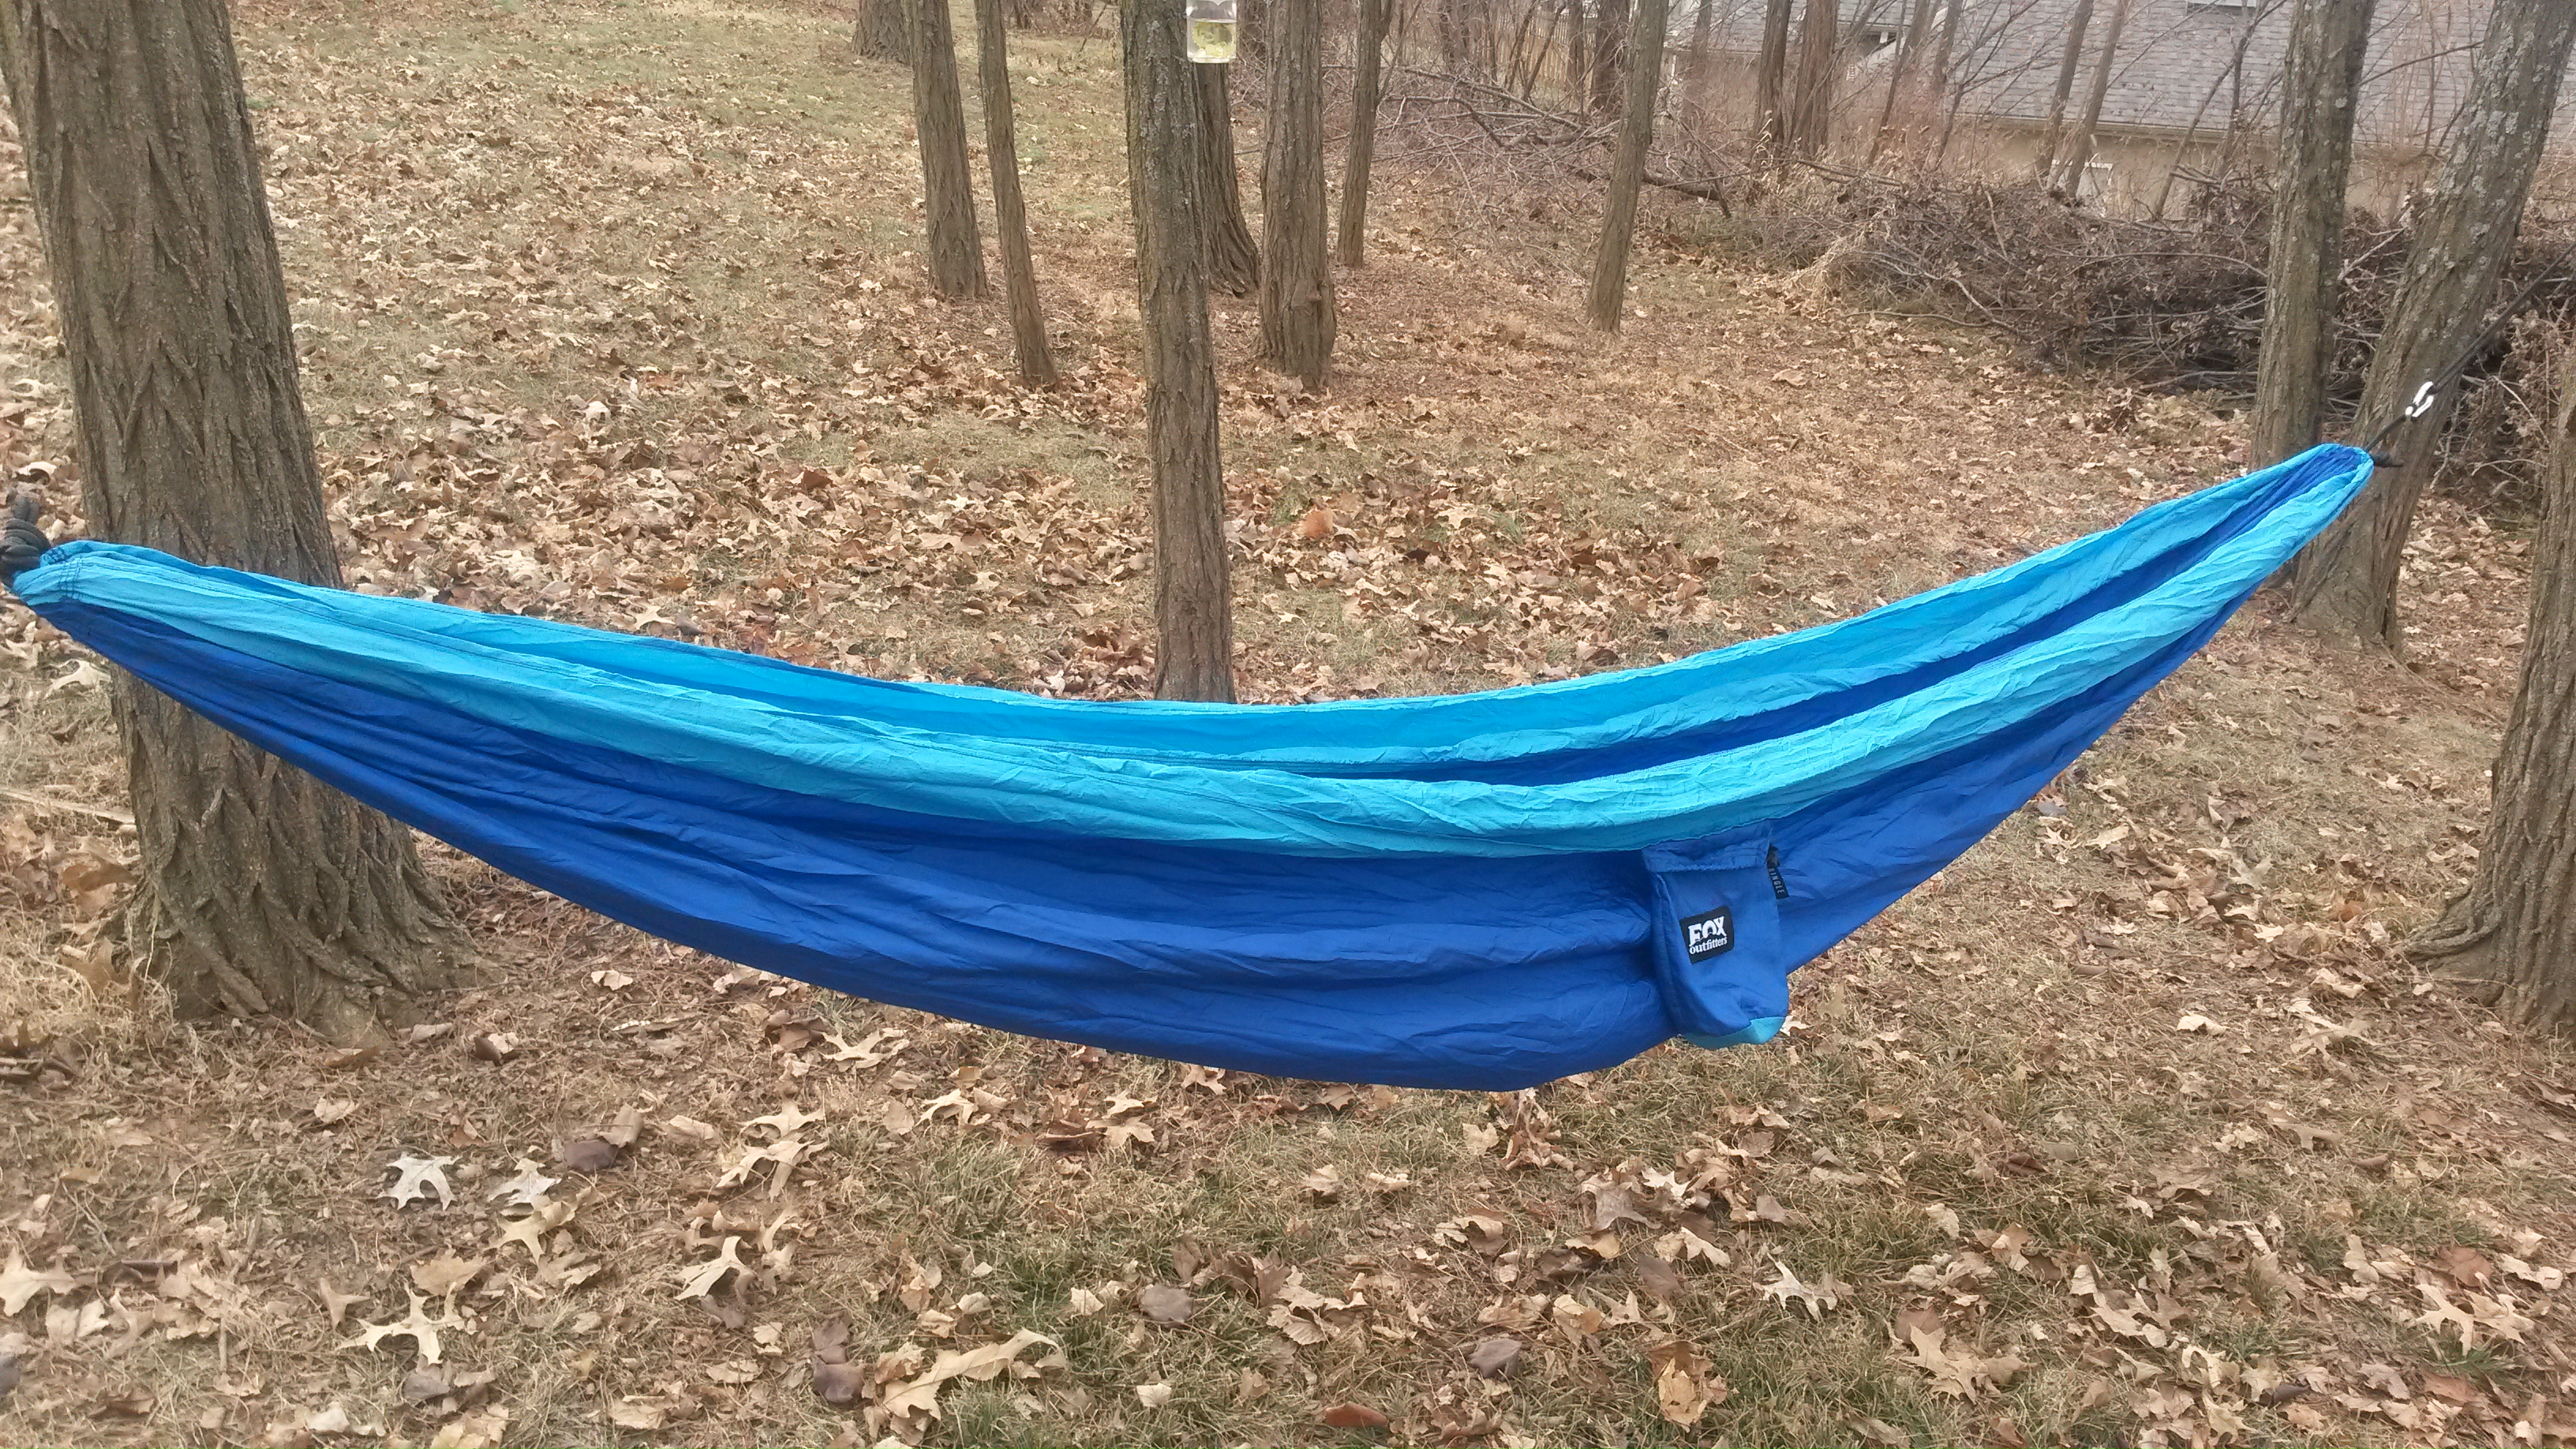
Sometimes when you get outside you just feel the need to embody the term “hanging out” and get relaxed in a hammock. Hammocks offer the wonderful feeling of floating gently in the breeze or sleeping in a cloud, and of late they are slowly working their way into our camping arsenal. With all of the available options on the market today one needs a starter hammock, a piece of kit that allows the user to give it a whirl but not break the bank. Enter the Fox Outfitter Neolite Hammock. This hammock is available in both a double and single version in the neighborhood of $40 to $50, and offer a great hammock for the price.
The Fox Outfitters Neolite hammock is an easy to hang, comfortable and relaxing piece of kit for either the backyard or any outdoor adventure. The hammock itself comes packed in an integrated stuff sack, so that way you have one less thing to lose while out and about. The only two non-attached pieces of the hammock are the hanging ropes, which are quite ingeniously designed.
These ropes are simple a large bite with a series of overhand knots tied in them to produce

Fox Outfitters Neolite hammock single stuff sack
multiple small loops. To use them you simply wrap the rope around a tree and through a selected loop to increase or decrease the overall length. Another smart feature is the included steel carabiners on each end of the hammock. Once you’ve hung the ropes you just click the hammock into place, get in a relax.
The Fox Outfitters single hammock is constructed out of a lightweight parachute style of nylon, that easily and comfortably fits a grown adult. It is a traditional open top style hammock that produces a slight cocoon effect when one enters, making it a comfortable outdoor nap fortress.
Fox Outfitters Neolite hammock single
The Fox Outfitters Neolite double hammock is large enough when slung, that one person will be cocooned completely in the extra fabric. We figured out almost immediately that a weight in the stuff sack will allow you to double the fabric back over yourself and create a light barrier against weather and bugs to some degree. Waterproofing the fabric before relying on this field expedient solution would be wise.
For the cost it is very comparable to other hammocks of this style and price, but is a better value overall just for the included easy to use ropes and carabiner setup. Considering other hammocks I have tried, Yukon Outfitters being an example, the included hanging kit from Fox Outfitters and ease of use of said hanging kit, makes the Fox Outfitters the winner.
Review : Solo Stove Campfire
A campfire is a central feature of most outdoor overnight adventures. Some scientists have even speculated that sitting around and staring at a campfire helped primitive humans evolve their minds and social structures. So it goes without saying that any time The Gear Whores are out in the woods, we are building a fire of some type. In some areas open burning could be considered irresponsible, or downright dangerous, so some type of container is needed. There are always traditional fire pits, cans, or grills, but what if you had a campfire that was also an efficient clean burning stove? The good folks at Solo Stove have taken their proven double wall woodgas stove design along with a “bigger is better” attitude and introduced the newest member of their team the Solo Stove Campfire.
Titan w/ Grill Bowl and Solo Stove Campfire
The Solo Stove Campfire is quite an impressive piece of camping kit. It is quite obviously not designed to meet the needs of the ultralight backpacker crowd out there, due to its size and weight, but that certainly isn’t the point. The overall dimensions of this beast allows it to play host to all of your fire needs around camp. Just as with the original and Titan the Campfire is a double wall constructed, stainless steel, woodgas stove. The rugged design is well executed, and the quality of construction is easily apparent. The matching two pot set makes this whole kit easily capable of providing meals for a larger group of people, from a family to a small Boy Scout patrol.
–Performance and Testing–
As is the case with many things bigger is better and the Solo Stove Campfire is no exception. With the Campfire being the largest of the series it definitely allows you to more easily construct a fire due to the bigger open area, as well as the use of larger pieces of biomass for fuels. The good folks at Solo suggest building a top down fire is the easiest and the most efficient way to get the entire thing started. In some of our testing we also opted to use your charcoal. This option was also quite easy to light and though charcoal doesn’t produce much flame, it does produce long lasting heat that was very good cook on. Granted not necessarily giving that true “campfire” experience, but it was certainly better than a Webber.
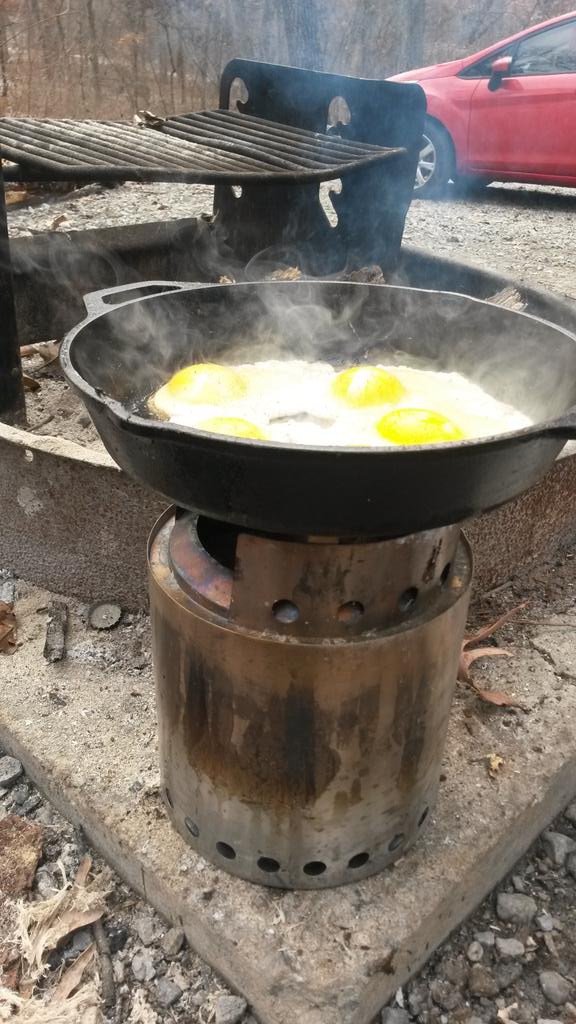
Solo Stove Campfire cooking eggs
The stove campfires size certainly allows for larger variety of cooking options. We immediately realized that the overall size the stove easily allowed it to host larger and heavier cooking implements such as a Lodge cast iron 12 inch skillet, which played host to a large and delicious breakfast of bacon and eggs on our latest camping adventure. The matching pot set for the Campfire is also much more accommodating in size. The smaller pot is about two inches deep and according to the embossed liquid volume indicators, easily holds 40 ounces of fluid. The larger pot is of a size that makes it perfect for cooking a larger meal. Offering the ability to cook 100 ounces of water makes it large enough for generous portions of stew, chili, pasta of any other delicious camping meal your crew can desire.
We weren’t in the mood for any of the aforementioned foods, we wanted steak. With dreams of meat dancing through our heads we thought the best way to approach things was to use a 48oz on the bone ribeye, dubbed a tomahawk steak from our local butcher. This three pound cow marshmallow was no match for the Solo Stove Campfire. Slowly hand turning our meat feast over the ample cooking space and heat of the Campfire produced a fantastic culinary experience.
–Overall impressions–
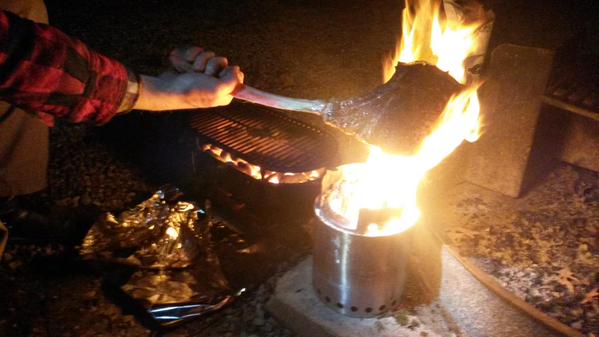
48oz ribeye cooking on Solo Stove Campfire
As with previous reviews we are impressed with this new addition to the Solo Stove lineup. This seriously large woodgas stove is a full on replacement for a fire pit and cooking stove for the family or scout troop. Using traditional found biomass, such as wood or even pouring in a whole load of charcoal, produces a long lasting efficient fire that entertains as well as feeds everyone. The matching pot set nests quite well around the Solo Stove Campfire, but the associated lids seem a bit awkward to stow. When we repacked the entire kit, the two lids went into the bottom of the bag with everything else stacked inside. This seemed the easiest and best solution. Also as you can imagine this bulky beast is reserved for car camping, unless your feeling froggy and just don’t care about bulk or weight. So whether in the backyard, or at a state park, the Solo Stove Campfire brings an efficient, bomb proof solution to fire production and cooking needs.